Let your refrigerated dough reach room temperature for two to eight hours, allowing gluten to relax and prevent snap-back. Start by pressing from the center outward, then pound the outer areas while protecting the rim. Use your knuckles to stretch the dough gradually, rotating it continuously through your hands. Gravity-assisted stretching—where you let the dough hang naturally—helps you reach the desired size without tearing. Proper hydration, adequate resting, and gentle technique prevent most tears. Understanding each step’s purpose will help you master this essential skill.
Key Takeaways
- Allow refrigerated dough to reach room temperature for 2–8 hours before stretching to prevent snap-back.
- Press from center outward using inverted V-shaped hand placement, then indent edges to define crust structure.
- Pound outer areas while protecting the rim, using fingers to gently stretch inner sections outward.
- Drape dough over knuckles and use gravity-assisted stretching by rotating it through your hands continuously.
- Prevent tearing by allowing adequate rests, checking hydration levels, and avoiding excessive force or sharp inclusions.
Prep Your Pizza Dough: Temperature, Flour, and Separation
Before you stretch pizza dough, you’ll want to prepare it properly by considering three essential factors: temperature, flour application, and dough separation. First, allow refrigerated dough to reach room temp, which takes between two and eight hours. This warming period makes certain the gluten relaxes, making stretching easier and preventing the dough from snapping back. Second, your flour choice matters greatly. I recommend using all-purpose flour for dusting your work surface and coating the dough ball, as it prevents sticking without being absorbed into the dough. Finally, separate stuck dough balls by dusting flour underneath them, then lift carefully into a flour pool. Coat the entire dough generously, flip it so the top surface faces upward, and you’re ready to begin shaping.
Start With the Initial Press: Your Foundation
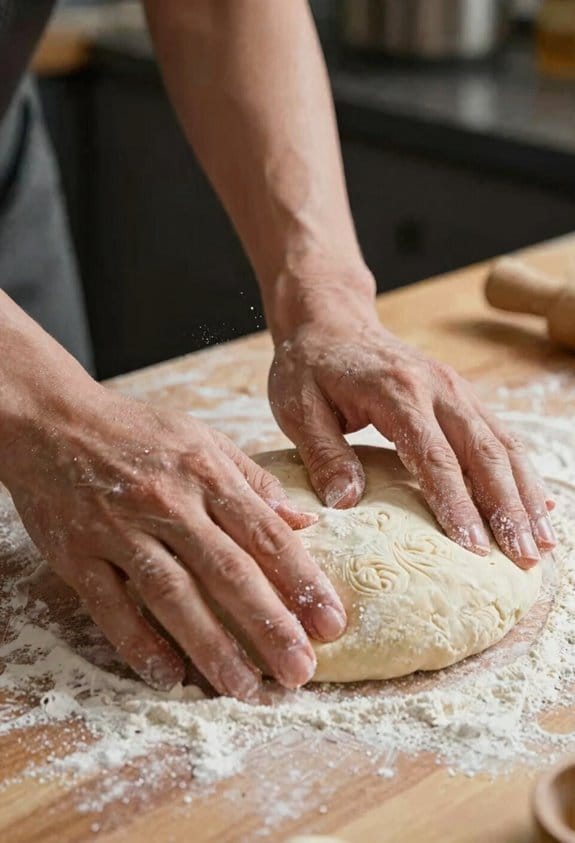
Once your dough’s properly prepped and resting at room temperature, you’re ready to create the foundation for your pizza by performing the initial press. I start by pressing from the center outward using inverted V-shaped hands, which distributes the dough evenly. Next, I indent around the edge about one inch from the rim to define the crust and establish rim aesthetics. This edge scoring creates a visual and structural boundary that separates the crust from the pizza surface. I flatten the middle using flat fingers without touching the counter, pushing air toward the crust edges while rotating the dough. Throughout this process, I avoid pressing the outermost inch to preserve rim structure and guarantee professional-looking results.
Pound and Stretch: Even Thickness Across the Dough

After you’ve established your foundation with the initial press, the pounding and stretching stage transforms your dough into an even, uniform thickness that’s ready for toppings. I find that maintaining a steady palm rhythm while pounding creates consistent results across the entire surface. Focus your efforts on the outer areas while avoiding the rim, which needs protection to develop into a proper crust. As you pound, use your fingers to gently stretch the inner sections outward, always rotating the dough fully between movements. Managing edge tension prevents tearing and guarantees your dough expands evenly. Keep the bottom side down and top side up throughout this process. Light flour on your workbench prevents sticking without compromising your dough’s texture.
Hand-Stretching Techniques for Controlled Shaping
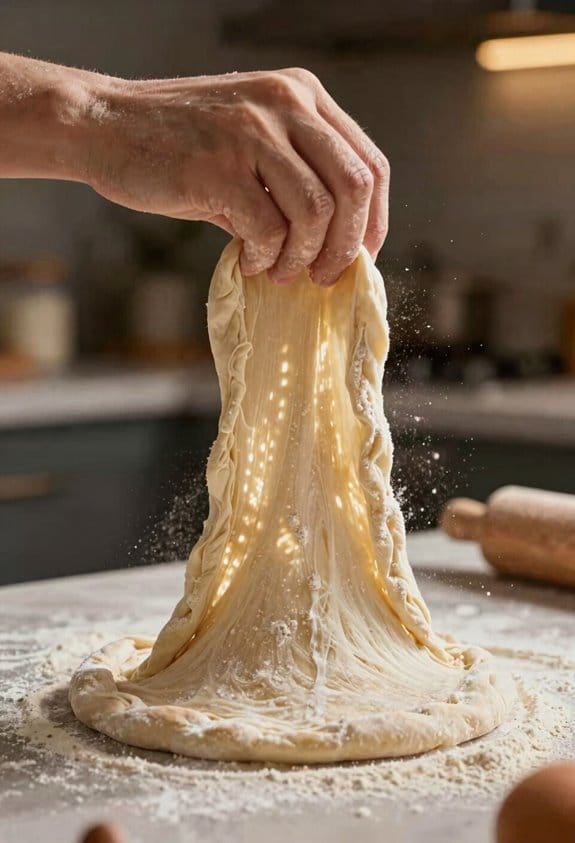
With your dough now at an even thickness, hand-stretching techniques give you precise control over the shaping process and help you achieve the exact size and thickness you want. I recommend draping the dough over your knuckles, then gently pulling your hands apart to stretch it gradually. Your finger placement matters notably here—keep your fingers relaxed and positioned underneath the dough to support it evenly. As you work, rotate the dough continuously through your hands using gentle wrist motion to stretch it to 10-12 inches in diameter. You can also hold it like a steering wheel and pass it hand-to-hand, letting gravity assist your efforts. These controlled techniques prevent tearing while developing the shape you need.
Gravity-Assisted Finishing: The Final Stretch

As you’ve progressed through hand-stretching techniques, you’ve built a foundation for the final stage of shaping your pizza dough. Now gravity becomes your ally. Pick up the dough from its far edge and let it hang naturally, allowing its weight to stretch it downward. The dough’s hydration level affects how smoothly this works—wetter dough stretches more easily under gravity’s pull.
Rotate the dough through your hands until it reaches eight to nine inches across. Lift it to eye level on your knuckles to guarantee even weight distribution throughout. This technique relies on minimal force, letting gravity handle the stretching work.
The edge elasticity improves as gravity gently extends the dough. Stop when you’ve reached your desired size without tearing. This finishing method produces a consistently shaped base ready for topping.
Why Your Dough Tears (and How to Prevent It)
When dough tears during stretching, the cause usually traces back to one of three main factors: insufficient resting time, improper hydration, or too much force applied during shaping. Underproofed dough lacks elasticity and resists extension, while overproofing issues make dough weak and fragile. I’ve found that properly rested dough stretches smoothly without breaking.
Check your dough’s hydration level, as too-dry dough becomes brittle. Sharp inclusions like coarse salt or debris can create weak points where tears originate. Always dust your work surface with flour beforehand.
Use gentle techniques like gravity-assisted stretching rather than aggressive pulling. Allow adequate resting time between shaping stages. Temperature matters too—room-temperature dough stretches more forgivingly than cold dough. These preventive measures markedly reduce tearing incidents.
Frequently Asked Questions
How Do I Know When My Dough Is Fully Proofed and Ready to Stretch?
I’ll tell you it’s not rocket science—just poke it. I use the finger prick test; if the indent springs back slowly, it’s ready. The windowpane test works too: stretch a small piece until it’s translucent without tearing.
Can I Stretch Dough Immediately After Removing It From the Refrigerator?
No, I don’t recommend immediate shaping after cold handling. Your dough needs 2-8 hours at room temperature to relax properly. This allows the gluten to loosen, making stretching easier and preventing the dough from constantly shrinking back.
What’s the Ideal Thickness for Home Pizza Oven Pizza Dough?
I’d recommend aiming for medium thickness—about a quarter-inch in the center—so you’ll get those crispy edges you’re after while maintaining a tender, chewy interior that’ll cook perfectly in your home oven.
Should I Use the Same Stretching Technique for Every Pizza Dough Batch?
No, you shouldn’t. Like water adapting to its container, your technique must shift with flour types and oven humidity. I’ve found varying hydration levels and moisture conditions demand personalized approaches—what works once rarely works identically twice.
How Long Can Stretched Dough Sit Before Baking in a Home Oven?
I’d recommend letting your stretched dough sit at room temperature for 30 minutes to 2 hours before baking. If you’re using cold proofing, you can refrigerate it overnight, which actually enhances flavor development.